NEC JC-4301P3A / APC-H4311: Difference between revisions
mNo edit summary |
|||
| (12 intermediate revisions by the same user not shown) | |||
| Line 1: | Line 1: | ||
{{WikipediaInfoAlt| | {{WikipediaInfoAlt|https://en.wikipedia.org/wiki/Multisync_monitor}} | ||
{{DeviceAlerts}} | {{DeviceAlerts}}Full CRT description can be found here https://crtdatabase.com/crts/nec/nec-jc-1401p3a<nowiki/>{{InfoboxDevice | ||
{{InfoboxDevice | |||
|Title = | |Title = | ||
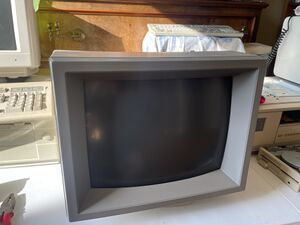
|Picture = | |Picture =APC-H4311 Screen.jpg | ||
|Release Year =1985 | |Release Year =1985 | ||
|Mounting Technology =Through hole | |Mounting Technology =Through hole | ||
| Line 12: | Line 11: | ||
|Display Interface=DE-9 female connector, with switch for TTL or analog input, switch for automatic or manual input setting and DIP switches for colour palette size}} | |Display Interface=DE-9 female connector, with switch for TTL or analog input, switch for automatic or manual input setting and DIP switches for colour palette size}} | ||
The JC-4101P3A is perhaps the first true multisync monitor. The APC-H4311 appears to be exactly the same monitor but with a model number to match the NEC APC IV PowerMate 1 desktop system unit it was paired with. | The JC-4101P3A is perhaps the first true multisync monitor. The APC-H4311 appears to be exactly the same monitor but with a model number to match the NEC APC IV PowerMate 1 desktop system unit it was paired with. The caps lists below created from the APC-H4311 (240V, 50Hz) version with a manufacturing date of June 1987 | ||
== Known Issues == | == Known Issues == | ||
| Line 27: | Line 26: | ||
# Remove fixed part of base by removing two screws | # Remove fixed part of base by removing two screws | ||
# Remove four corner screws holding rear of case to front of monitor | # Remove four corner screws holding rear of case to front of monitor | ||
# Gently slide the rear of the case backwards. May need | # Gently slide the rear of the case backwards. May need spudger to initially loosen. | ||
# Four screws to remove rear access panel | # Four screws to remove rear access panel shielding. | ||
# Three screws, one on each side panel and one near flyback, to remove top chassis/shielding | # Three screws, one on each chassis side panel and one near flyback, to remove top chassis/shielding. | ||
# Undo screws holding | # Two screws, one on each chassis side panel, to remove rear chassis/shielding. | ||
# Undo screws holding switching regulator and interface board assembly and disconnect supply lead, degaussing coil lead and C and K leads from the regulator board and four different control/data leads on the interface board before sliding assembly upwards.<br /> | |||
== Images == | |||
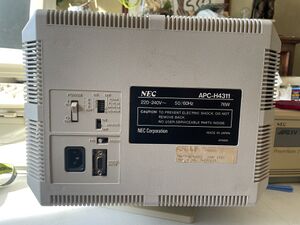
[[File:APC-H4311 Rear.jpg|alt=This image shows the rear view of the monitor, including power switch, TTL/Analog switch, DIP switches and DE-9 connector|thumb|APC-H4311 Rear view|left]] | |||
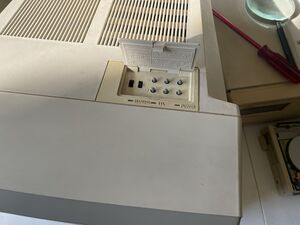
[[File:APC-H4311 Controls.jpg|alt=This image shows the controls located on the top of the monitor, including, brightness, contrast, horizontal and vertical hold adjustments.|thumb|APC-H4311 top panel controls|center]] | |||
. | |||
. | |||
== Original Parts == | == Original Parts == | ||
There are a number of different boards found in the monitor | There are a number of different boards found in the monitor | ||
| Line 39: | Line 46: | ||
|- | |- | ||
|Switching Reg | |Switching Reg | ||
|PWE-107 (JC-1401P3A, 120V) | |PWE-107 (JC-1401P3A, 120V, 60Hz) | ||
PWE-142 (APC-H4311, 240V Australia?) | PWE-142 (APC-H4311, 240V, 50Hz, Australia(?) ) | ||
|Different boards, appears to depend on supply country voltage. | |Different boards, appears to depend on supply country voltage. | ||
|- | |- | ||
| Line 63: | Line 70: | ||
| | | | ||
|- | |- | ||
|CRT | |CRT board | ||
|PWE-123 | |PWE-123 | ||
| | | | ||
|- | |- | ||
|Tube | |Tube | ||
|370HYB22-TC126 (PN2) | |370HYB22-TC126 (PN2), as found in APC-H4311 model | ||
|May differ | |May differ? | ||
|} | |} | ||
=== PWE-110 Interface === | === PWE-110 Interface Board === | ||
'''Capacitor [[Capacitor Specifications|Specifications]] and [[Part Footprints|Footprint]] Information''' | '''Capacitor [[Capacitor Specifications|Specifications]] and [[Part Footprints|Footprint]] Information''' | ||
{| class="wikitable sortable" | {| class="wikitable sortable" | ||
| Line 88: | Line 95: | ||
!Series | !Series | ||
|- | |- | ||
| | |C819 | ||
| | |1 | ||
| | |1 uF | ||
| | |50 | ||
| | |TH | ||
| | |5 | ||
| | |12 | ||
| | |5 | ||
| | |85C | ||
| | |Electrolytic | ||
| | |Rubycon | ||
| | |CE W ? | ||
M3441 ? | |||
|- | |||
|C820 | |||
|1 | |||
|2.2 uF | |||
|50 | |||
|TH | |||
|5 | |||
|12 | |||
|5 | |||
|85C | |||
|Electrolytic | |||
|Rubycon | |||
|CE W ? | |||
M856 ? | |||
|- | |||
|C812, C813, C829 | |||
|3 | |||
|10 uF | |||
|16 | |||
|TH | |||
|5 | |||
|11 | |||
|5 | |||
|85C | |||
|Electrolytic | |||
|Nichicon | |||
|A8716 ? | |||
SE (M) ? | |||
|- | |||
|C806, C827 | |||
|2 | |||
|47 uF | |||
|16 | |||
|TH | |||
|6 | |||
|12 | |||
|5 | |||
|85C | |||
|Electrolytic | |||
|Matsushita | |||
|S | |||
|- | |||
|C805, C804 | |||
|2 | |||
|47 uF | |||
|16 | |||
|TH | |||
|6 | |||
|12 | |||
|5 | |||
| -55-+105C | |||
|Electrolytic | |||
|Rubicon | |||
|PS-1 (?) | |||
|- | |||
|C832 | |||
|2 | |||
|100 uF | |||
|10 | |||
|TH | |||
|6 | |||
|11 | |||
|5 | |||
|(M)105C | |||
|Electrolytic | |||
|Chemicon | |||
|KM | |||
|- | |||
|C801 | |||
|1 | |||
|100 uF | |||
|16 | |||
|TH | |||
|8 | |||
|11 | |||
|5 | |||
|85C | |||
|Electrolytic | |||
|Rubycon | |||
|CE W ? | |||
M552 | |||
|- | |||
|C815 | |||
|1 | |||
|220 uF | |||
|10 | |||
|TH | |||
|8 | |||
|12 | |||
|5 | |||
|85C | |||
|Electrolytic | |||
|Nichicon | |||
|SE(M) ? | |||
|- | |||
|C810 | |||
|1 | |||
|220 uF | |||
|16 | |||
|TH | |||
|9 | |||
|12 | |||
|5 | |||
|(M)85C | |||
|Electrolytic | |||
|Chemicon | |||
|71 ? | |||
Z(2) ? | |||
|} | |} | ||
=== PWE-142 Switching Regulator === | === PWE-142 Switching Regulator Board === | ||
{| class="wikitable sortable" | {| class="wikitable sortable" | ||
|+Capacitor [[Capacitor Specifications|Specifications]] and [[Part Footprints|Footprint]] Information | |+Capacitor [[Capacitor Specifications|Specifications]] and [[Part Footprints|Footprint]] Information | ||
| Line 118: | Line 234: | ||
!Series | !Series | ||
|- | |- | ||
|C664 | |||
|1 | |||
|1 uF | |||
|160 | |||
|TH | |||
| | |||
| | |||
| | |||
|0 °C | |||
|Electrolytic | |||
|Rubicon | |||
|SH | |||
|- | |||
|C609, C615 | |||
|2 | |||
|4.7 uF | |||
|50 | |||
|TH | |||
| | |||
| | |||
| | |||
| | |||
|Electrolytic | |||
|Chemicon | |||
| | |||
|- | |||
|C621, C620 | |||
|2 | |||
|22 uF | |||
|50 | |||
|TH | |||
| | |||
| | |||
| | |||
| | |||
|Electrolytic | |||
|Chemicon | |||
| | |||
|- | |||
|C654 | |||
|1 | |||
|100 uF | |||
|35 | |||
|TH | |||
| | |||
| | |||
| | |||
|(M) 105C | |||
|Electrolytic | |||
|Chemicon | |||
| | |||
|- | |||
|C653 | |||
|1 | |||
|100 uF | |||
|100 | |||
|TH | |||
| | |||
| | |||
| | |||
|(M) 105C | |||
|Electrolytic | |||
|Chemicon | |||
|KMC | |||
72 | |||
L(2) | |||
|- | |||
|C658, C662, C657 | |||
|3 | |||
|100 uF | |||
|160 | |||
|TH | |||
| | |||
| | |||
| | |||
|105C | |||
|Electrolytic | |||
|Rubycon | |||
|SH | |||
51 | |||
|- | |||
|C611, C617 | |||
|2 | |||
|220 uF | |||
|16 | |||
|TH | |||
| | |||
| | |||
| | |||
| | |||
|Electrolytic | |||
| | |||
| | |||
|- | |||
|C651 | |||
|1 | |||
|330 uF | |||
|100 | |||
|TH | |||
| | |||
| | |||
| | |||
| -55-+105C | |||
|Electrolytic | |||
|Rubycon | |||
| | |||
|- | |||
|C610, C616 | |||
|2 | |||
|470 uF | |||
|16 | |||
|TH | |||
| | |||
| | |||
| | |||
|(M) 105C | |||
|Electrolytic | |||
|Chemicon | |||
| | |||
|- | |||
|C652 | |||
|1 | |||
|470 uF | |||
|35 | |||
|TH | |||
| | |||
| | |||
| | |||
|(M) 105C | |||
|Electrolytic | |||
| | |||
| | |||
|- | |||
|C605 | |||
|1 | |||
|220 uF | |||
|400 | |||
|TH | |||
|35 | |||
|40 | |||
|15 | |||
|105C | |||
|Electrolytic | |||
|Nippon Chemicon | |||
|KM | |||
|- | |||
| | |||
| | |||
| | | | ||
| | | | ||
| | | | ||
| | | | ||
| Line 126: | Line 389: | ||
| | | | ||
| | | | ||
| | | | ||
| | | | ||
| Line 150: | Line 412: | ||
== Related Links == | == Related Links == | ||
Full CRT description can be found here https://crtdatabase.com/crts/nec/nec-jc-1401p3a | |||
Service manual can be found here https://ia803403.us.archive.org/28/items/nec-jc-1401-p-3-a/NEC%20JC-1401P3A.pdf | |||
== References == | == References == | ||
<references /> | <references /> | ||
[[Category:CRT]] | |||
[[Category:WorkNeeded:OriginalParts]] | |||
[[Category:WorkNeeded:ReplacementParts]] | |||
[[Category:Computer Monitor]] | |||
[[Category:1980s]] | |||
Latest revision as of 00:04, 27 November 2024
- For more information, see this article's corresponding Wikipedia page: https://en.wikipedia.org/wiki/Multisync_monitor.
| This device is in the WorkNeeded:OriginalParts category because it was flagged as missing information on the original parts. It may have replacement parts listed but those cannot be assumed to be identical to the originals. If you have a list of the original parts, please feel free to add them by copying the relevant table from EditorsToolbox:Tables |
| This device is in the WorkNeeded:ReplacementParts category because it was flagged as missing information on replacement parts. If it has the original parts listed you may be able to search for replacements using the parametric searches available from parts distributors. If you have or make a list of replacement parts, please feel free to add them by copying the relevant table from EditorsToolbox:Tables |
Full CRT description can be found here https://crtdatabase.com/crts/nec/nec-jc-1401p3a
| Preliminary Information | |
|---|---|
| Release Year | 1985 |
| Leak Risk | High |
| Batteries | None |
| Mounting Technology | Through hole |
| Capacitor Types | Aluminium Electrolytic, ceramic |
| Destructive Entry | No |
| Hardware Specifications | |
| Display Interface | DE-9 female connector, with switch for TTL or analog input, switch for automatic or manual input setting and DIP switches for colour palette size |
| CRT Guides | |
| General Information · Repair Cautions | |
The JC-4101P3A is perhaps the first true multisync monitor. The APC-H4311 appears to be exactly the same monitor but with a model number to match the NEC APC IV PowerMate 1 desktop system unit it was paired with. The caps lists below created from the APC-H4311 (240V, 50Hz) version with a manufacturing date of June 1987
Known Issues
Symptom or Problem Encountered
Causes
- Electrolytic capacitor failures due to normal aging.
Solutions
- Replace electrolytic capacitors
Disassembly Notes
- Unplug power and data cables
- Turn rotating part of base through 180 degrees and slide off
- Remove fixed part of base by removing two screws
- Remove four corner screws holding rear of case to front of monitor
- Gently slide the rear of the case backwards. May need spudger to initially loosen.
- Four screws to remove rear access panel shielding.
- Three screws, one on each chassis side panel and one near flyback, to remove top chassis/shielding.
- Two screws, one on each chassis side panel, to remove rear chassis/shielding.
- Undo screws holding switching regulator and interface board assembly and disconnect supply lead, degaussing coil lead and C and K leads from the regulator board and four different control/data leads on the interface board before sliding assembly upwards.
Images


. .
Original Parts
There are a number of different boards found in the monitor
| Purpose | Designation | Notes |
| Switching Reg | PWE-107 (JC-1401P3A, 120V, 60Hz)
PWE-142 (APC-H4311, 240V, 50Hz, Australia(?) ) |
Different boards, appears to depend on supply country voltage. |
| Interface | PWE-110 | |
| Deflection | PWE-105 | |
| Control | PWE-125A | |
| LED | PWE-125B | |
| Video | PWE-122 | |
| CRT board | PWE-123 | |
| Tube | 370HYB22-TC126 (PN2), as found in APC-H4311 model | May differ? |
PWE-110 Interface Board
Capacitor Specifications and Footprint Information
| RefDes | Qty | Capacitance | Voltage | Mount | Diameter/Size | Height | Lead Spacing | Temp | Type | Brand | Series |
|---|---|---|---|---|---|---|---|---|---|---|---|
| C819 | 1 | 1 uF | 50 | TH | 5 | 12 | 5 | 85C | Electrolytic | Rubycon | CE W ?
M3441 ? |
| C820 | 1 | 2.2 uF | 50 | TH | 5 | 12 | 5 | 85C | Electrolytic | Rubycon | CE W ?
M856 ? |
| C812, C813, C829 | 3 | 10 uF | 16 | TH | 5 | 11 | 5 | 85C | Electrolytic | Nichicon | A8716 ?
SE (M) ? |
| C806, C827 | 2 | 47 uF | 16 | TH | 6 | 12 | 5 | 85C | Electrolytic | Matsushita | S |
| C805, C804 | 2 | 47 uF | 16 | TH | 6 | 12 | 5 | -55-+105C | Electrolytic | Rubicon | PS-1 (?) |
| C832 | 2 | 100 uF | 10 | TH | 6 | 11 | 5 | (M)105C | Electrolytic | Chemicon | KM |
| C801 | 1 | 100 uF | 16 | TH | 8 | 11 | 5 | 85C | Electrolytic | Rubycon | CE W ?
M552 |
| C815 | 1 | 220 uF | 10 | TH | 8 | 12 | 5 | 85C | Electrolytic | Nichicon | SE(M) ? |
| C810 | 1 | 220 uF | 16 | TH | 9 | 12 | 5 | (M)85C | Electrolytic | Chemicon | 71 ?
Z(2) ? |
PWE-142 Switching Regulator Board
| RefDes | Qty | Capacitance | Voltage | Mount | Diameter/Size | Height | Lead Spacing | Temp | Type | Brand | Series |
|---|---|---|---|---|---|---|---|---|---|---|---|
| C664 | 1 | 1 uF | 160 | TH | 0 °C | Electrolytic | Rubicon | SH | |||
| C609, C615 | 2 | 4.7 uF | 50 | TH | Electrolytic | Chemicon | |||||
| C621, C620 | 2 | 22 uF | 50 | TH | Electrolytic | Chemicon | |||||
| C654 | 1 | 100 uF | 35 | TH | (M) 105C | Electrolytic | Chemicon | ||||
| C653 | 1 | 100 uF | 100 | TH | (M) 105C | Electrolytic | Chemicon | KMC
72 L(2) | |||
| C658, C662, C657 | 3 | 100 uF | 160 | TH | 105C | Electrolytic | Rubycon | SH
51 | |||
| C611, C617 | 2 | 220 uF | 16 | TH | Electrolytic | ||||||
| C651 | 1 | 330 uF | 100 | TH | -55-+105C | Electrolytic | Rubycon | ||||
| C610, C616 | 2 | 470 uF | 16 | TH | (M) 105C | Electrolytic | Chemicon | ||||
| C652 | 1 | 470 uF | 35 | TH | (M) 105C | Electrolytic | |||||
| C605 | 1 | 220 uF | 400 | TH | 35 | 40 | 15 | 105C | Electrolytic | Nippon Chemicon | KM |
Replacement Parts
Basic PCB Name
| RefDes | Qty | Compatible Part Number | Order Links |
|---|---|---|---|
| Digikey |
If parts are not available or different selection is preferred, you can use the values in the Original Parts section to perform a parametric search.
Related Links
Full CRT description can be found here https://crtdatabase.com/crts/nec/nec-jc-1401p3a
Service manual can be found here https://ia803403.us.archive.org/28/items/nec-jc-1401-p-3-a/NEC%20JC-1401P3A.pdf
