Chauvet Strike 1: Difference between revisions
Millstream (talk | contribs) m (Added more) |
Millstream (talk | contribs) m (Update) |
||
| Line 2: | Line 2: | ||
{{DeviceAlerts}} | {{DeviceAlerts}} | ||
{{InfoboxDevice | {{InfoboxDevice | ||
|Title = | |Title = Chauvet Strike 1 | ||
|Picture = | |Picture = | ||
|Mounting Technology = Through Hole, SMD, BGA, Sockets | |Mounting Technology = Through Hole, SMD, BGA, Sockets | ||
|Capacitor Types = Aluminum Electrolytic, Tantalum, Ceramic, Polymer | |Capacitor Types = Aluminum Electrolytic, Tantalum, Ceramic, Polymer | ||
|Batteries = None | |Batteries = None | ||
|Destructive Entry = No | |Destructive Entry = No | ||
| Line 14: | Line 12: | ||
==Known Issues== | ==Known Issues== | ||
===Symptom or Problem Encountered=== | ===Symptom or Problem Encountered=== | ||
Non functioning light. | Non functioning light. No display on the control panel. | ||
I was told it's the PSU. It wasn't. | I was told it's the PSU. It wasn't. | ||
====Causes==== | ====Causes==== | ||
*Shorted diode on controller board. | *Shorted diode on controller board. | ||
| Line 23: | Line 20: | ||
*Replace a £0.60 diode. | *Replace a £0.60 diode. | ||
==Disassembly Notes== | ==Disassembly Notes== | ||
These are outdoor lights and the cap head screws may have corrosion in the aluminium housing. Use penetrating oil if possible. | These are outdoor lights and the cap head screws may have corrosion in the aluminium housing. Use penetrating oil if possible. | ||
Remove the three cap head screws holding the display and control panel housing. | Remove the three cap head screws holding the display and control panel housing. | ||
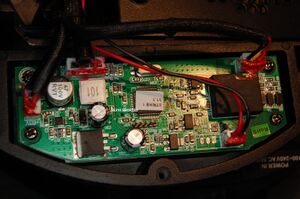
[[File:Controller board.jpg|thumb|Controller board showing faulty diode.]] | [[File:Controller board.jpg|thumb|Controller board showing faulty diode.]] | ||
== Diagnosis == | == Diagnosis == | ||
Without power connected check for a short across D2, adjacent to the inductor | Without power connected check for a short across D2, adjacent to the inductor. | ||
If short lift | If short, lift one side of the diode (or remove it completely) and check the diode and the solder pads. In my case the short on the board went away. | ||
The voltage to the board is 63V. | NB: The voltage to the board is 63V DC. | ||
Replacing the diode fixed the fault. But As to what caused the failure in the first place? | Replacing the diode fixed the fault. But As to what caused the failure in the first place? | ||
I repaired two of these with identical faults. | I repaired two of these with identical faults. | ||
==Original Parts== | ==Original Parts== | ||
===Basic PCB Name=== | ===Basic PCB Name=== | ||
| Line 52: | Line 47: | ||
!Temp | !Temp | ||
![https://caps.wiki/wiki/Capacitor_Types Type] | ![https://caps.wiki/wiki/Capacitor_Types Type] | ||
|- | |- | ||
|SS310 | |SS310 | ||
| Line 63: | Line 56: | ||
| | | | ||
|0 °C | |0 °C | ||
| | | | ||
|} | |} | ||
Revision as of 21:42, 14 July 2023
- For more information, see this article's corresponding Wikipedia page: Device.
| Preliminary Information | |
|---|---|
| Batteries | None |
| Mounting Technology | Through Hole, SMD, BGA, Sockets |
| Capacitor Types | Aluminum Electrolytic, Tantalum, Ceramic, Polymer |
| Destructive Entry | No |
This is a template page for creating new pages for devices, troubleshooting them, part lists, and other repair info.
Known Issues
Symptom or Problem Encountered
Non functioning light. No display on the control panel.
I was told it's the PSU. It wasn't.
Causes
- Shorted diode on controller board.
Solutions
- Replace a £0.60 diode.
Disassembly Notes
These are outdoor lights and the cap head screws may have corrosion in the aluminium housing. Use penetrating oil if possible. Remove the three cap head screws holding the display and control panel housing.

Diagnosis
Without power connected check for a short across D2, adjacent to the inductor.
If short, lift one side of the diode (or remove it completely) and check the diode and the solder pads. In my case the short on the board went away.
NB: The voltage to the board is 63V DC.
Replacing the diode fixed the fault. But As to what caused the failure in the first place?
I repaired two of these with identical faults.
Original Parts
Basic PCB Name
Note model numbers and board revisions here
| RefDes | Qty | Voltage | Current | Mount | Diameter/Size | Height | Temp | Type |
|---|---|---|---|---|---|---|---|---|
| SS310 | 1 | 100 | 3A | SMD | 0 °C |
Replacement Parts
Basic PCB Name
| RefDes | Qty | Compatible Part Number | Order Links |
|---|---|---|---|
| 1 |
If parts are not available or different selection is preferred, you can use the values in the Original Parts section to perform a parametric search.