Disassembly:Microsoft Xbox: Difference between revisions
Jump to navigation
Jump to search
m (→Required Tools) |
(Less inexplicable temp image) |
||
| (5 intermediate revisions by one other user not shown) | |||
| Line 1: | Line 1: | ||
== | ==Pre-disassembly Checklist== | ||
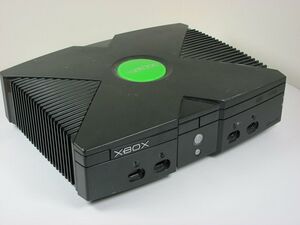
[[File:Xbox1.jpg|thumb|[https://www.ifixit.com/Guide/Xbox+Disassembly/1308 Xbox Disassembly - iFixit Repair Guide]]] | [[File:Xbox1.jpg|thumb|[https://www.ifixit.com/Guide/Xbox+Disassembly/1308 Xbox Disassembly - iFixit Repair Guide]]] | ||
* Unplug all cables from the console | * Unplug all cables from the console | ||
* Repeatedly press the power button to discharge all internal capacitors | * Repeatedly press the power button to discharge all internal capacitors | ||
* Place the Xbox on a flat surface | * Place the Xbox on a flat surface | ||
{| class="wikitable" | <div style="display: flex;justify-content: space-between;flex-wrap: wrap;"> | ||
{| class="wikitable" style="display: inline-block;margin-top:50px;" | |||
|+ RTC Capacitor repair | |+ RTC Capacitor repair | ||
! | ! | ||
!Motherboard access disassembly steps | !Motherboard access disassembly steps | ||
|- | |- | ||
|[[File: | |[[File:example.png|thumb]] | ||
|Flip the Xbox over and gently pry the rubber feet with a stable hand or a spudger. Peel them back from the outer edge of the device just enough to expose the screw heads. | |Flip the Xbox over and gently pry the rubber feet with a stable hand or a spudger. Peel them back from the outer edge of the device just enough to expose the screw heads. | ||
|- | |- | ||
| Line 19: | Line 17: | ||
|Peel back both the silver sticker and the white barcode sticker to reveal two additional screws. | |Peel back both the silver sticker and the white barcode sticker to reveal two additional screws. | ||
|- | |- | ||
|[[File: | |[[File:example.png|thumb]] | ||
|Use the | |Use the T20 Torx screwdriver to remove the four screws located under the rubber feet you just removed as well as the two screws from beneath the stickers removed in the previous step. | ||
|- | |- | ||
|[[File:Topshell.jpg|thumb|[https://www.ifixit.com/Guide/Xbox+Disassembly/1308 Xbox Disassembly - iFixit Repair Guide]]] | |[[File:Topshell.jpg|thumb|[https://www.ifixit.com/Guide/Xbox+Disassembly/1308 Xbox Disassembly - iFixit Repair Guide]]] | ||
| Line 26: | Line 24: | ||
|- | |- | ||
|[[File:Ribbonmove.jpg|thumb|[https://www.ifixit.com/Guide/Xbox+Disassembly/1308 Xbox Disassembly - iFixit Repair Guide]]] | |[[File:Ribbonmove.jpg|thumb|[https://www.ifixit.com/Guide/Xbox+Disassembly/1308 Xbox Disassembly - iFixit Repair Guide]]] | ||
|Move the grey IDE ribbon cable out of the way in order to remove the three 3mm screws using the | |Move the grey IDE ribbon cable out of the way in order to remove the three 3mm screws using the T10 Torx screwdriver. They are located on the upper right corner, lower right, and lower left corners of disc drive. | ||
There is an empty hole on the side of the disc drive's caddy. This hole is only used by an external screw and can be ignored until the final stages of reassembly. | There is an empty hole on the side of the disc drive's caddy. This hole is only used by an external screw and can be ignored until the final stages of reassembly. | ||
Be careful of the IDE cable. | Be careful of the IDE cable. | ||
|- | |- | ||
|[[File: | |[[File:example.png|thumb]] | ||
|Unplug the molex cable and the IDE ribbon cable from the back of the hard drive. Lift the hard drive assembly out of the Xbox. It should come right out. | |Unplug the molex cable and the IDE ribbon cable from the back of the hard drive. Lift the hard drive assembly out of the Xbox. It should come right out. | ||
|- | |- | ||
| Line 45: | Line 43: | ||
|Unplug the front panel connectors from the Xbox motherboard. | |Unplug the front panel connectors from the Xbox motherboard. | ||
|- | |- | ||
|[[File: | |[[File:example.png|thumb]] | ||
|Unplug the exhaust fan's cable from the Xbox motherboard. | |Unplug the exhaust fan's cable from the Xbox motherboard. | ||
|- | |- | ||
| Line 54: | Line 52: | ||
|Remove the motherboard from the Xbox. As long as all of the screws are out and the fan is disconnected, it will lift out easily. | |Remove the motherboard from the Xbox. As long as all of the screws are out and the fan is disconnected, it will lift out easily. | ||
|} | |} | ||
{| class="wikitable" | |||
{| class="wikitable" style="display: inline-block;margin-top:50px;" | |||
|+ Disc drive repair | |+ Disc drive repair | ||
|- | |- | ||
| Line 61: | Line 60: | ||
| Example || Example | | Example || Example | ||
|} | |} | ||
</div> | |||
Latest revision as of 07:35, 17 February 2022
Pre-disassembly Checklist
- Unplug all cables from the console
- Repeatedly press the power button to discharge all internal capacitors
- Place the Xbox on a flat surface
| Motherboard access disassembly steps | |
|---|---|
 |
Flip the Xbox over and gently pry the rubber feet with a stable hand or a spudger. Peel them back from the outer edge of the device just enough to expose the screw heads. |
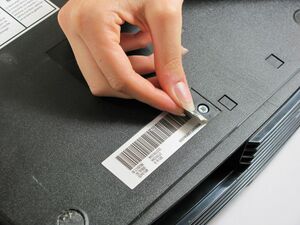 |
Peel back both the silver sticker and the white barcode sticker to reveal two additional screws. |
 |
Use the T20 Torx screwdriver to remove the four screws located under the rubber feet you just removed as well as the two screws from beneath the stickers removed in the previous step. |
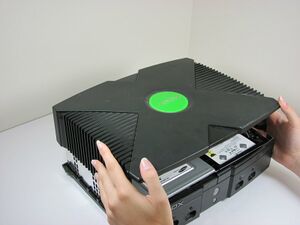 |
Once the bottom screws are removed, carefully turn the Xbox right-side-up and lift off the top shell. |
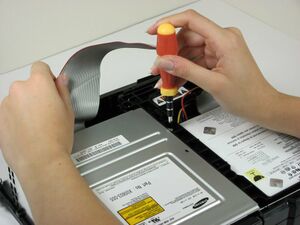 |
Move the grey IDE ribbon cable out of the way in order to remove the three 3mm screws using the T10 Torx screwdriver. They are located on the upper right corner, lower right, and lower left corners of disc drive.
There is an empty hole on the side of the disc drive's caddy. This hole is only used by an external screw and can be ignored until the final stages of reassembly. Be careful of the IDE cable. |
 |
Unplug the molex cable and the IDE ribbon cable from the back of the hard drive. Lift the hard drive assembly out of the Xbox. It should come right out. |
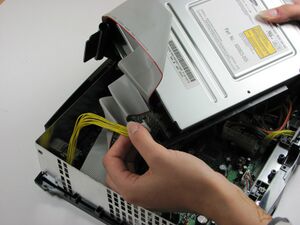 |
Unplug the IDE ribbon cable and yellow cables from back of disc drive. Lift the disc drive assembly out of the Xbox. It should come right out. |
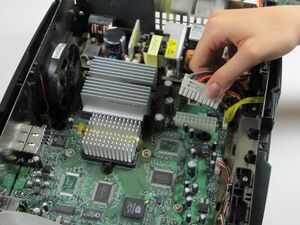 |
Unplug the large ATX power cable from the motherboard. It can be plugged in very tight, so it may take some effort to unplug it.
Make sure to press on the connector's retention clip. |
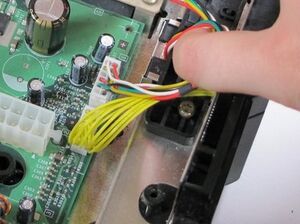 |
Unplug the front panel connectors from the Xbox motherboard. |
 |
Unplug the exhaust fan's cable from the Xbox motherboard. |
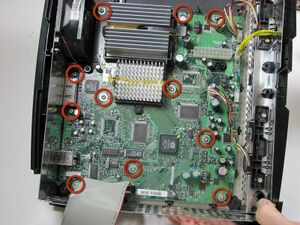 |
Unscrew the eleven Torx T10 screws from the motherboard. |
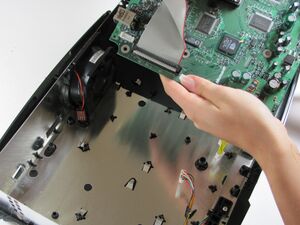 |
Remove the motherboard from the Xbox. As long as all of the screws are out and the fan is disconnected, it will lift out easily. |
| Drive belt access disassembly steps | |
|---|---|
| Example | Example |