Nintendo Entertainment System: Difference between revisions
Jump to navigation
Jump to search
(New page) |
Razorbeamz (talk | contribs) (Added Nintendo category) |
||
| (9 intermediate revisions by 7 users not shown) | |||
| Line 1: | Line 1: | ||
{{ | {{WikipediaInfoAlt|Nintendo Entertainment System}} | ||
{{DeviceAlerts}} | {{DeviceAlerts}} | ||
{{InfoboxDevice | {{InfoboxDevice | ||
|Title = Nintendo Entertainment System | |Title = Nintendo Entertainment System | ||
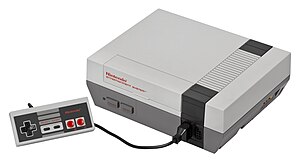
|Picture = | |Picture = NES-Console-Set.jpg | ||
|Release Year = 1985 | |Release Year = 1985 | ||
|Mounting Technology = Through Hole, SMD, BGA, Sockets | |Mounting Technology = Through Hole, SMD, BGA, Sockets | ||
| Line 17: | Line 15: | ||
==Known Issues== | ==Known Issues== | ||
=== | ===Cartridges not working=== | ||
This is one of the most common issues with the NES. | |||
====Causes==== | ====Causes==== | ||
| Line 31: | Line 30: | ||
==Disassembly Notes== | ==Disassembly Notes== | ||
{{MoreInfo|Page Name=Disassembly:Nintendo_Entertainment_System}} | |||
==Original Parts== | ==Original Parts== | ||
| Line 181: | Line 119: | ||
==References== | ==References== | ||
<references /> | <references /> | ||
[[Category:1980s]] | |||
[[Category:WorkNeeded:OriginalParts]] | |||
[[Category:Game Console]] | |||
[[Category:WorkNeeded:ReplacementParts]] | |||
[[Category:Nintendo]] | |||
Latest revision as of 15:29, 14 March 2022
- For more information, see this article's corresponding Wikipedia page: Nintendo Entertainment System.
| This device is in the WorkNeeded:OriginalParts category because it was flagged as missing information on the original parts. It may have replacement parts listed but those cannot be assumed to be identical to the originals. If you have a list of the original parts, please feel free to add them by copying the relevant table from EditorsToolbox:Tables |
| This device is in the WorkNeeded:ReplacementParts category because it was flagged as missing information on replacement parts. If it has the original parts listed you may be able to search for replacements using the parametric searches available from parts distributors. If you have or make a list of replacement parts, please feel free to add them by copying the relevant table from EditorsToolbox:Tables |
Nintendo Entertainment System
| Preliminary Information | |
|---|---|
| Release Year | 1985 |
| Leak Risk | Low |
| Batteries | None |
| Mounting Technology | Through Hole, SMD, BGA, Sockets |
| Capacitor Types | Aluminum Electrolytic, Tantalum, Ceramic, Polymer |
| Destructive Entry | No |
The Nintendo Entertainment System (NES) is an 8-bit third-generation home video game console produced by Nintendo. It was first released as the Family Computer (FC), commonly known as the Famicom in 1983 in Japan. The NES, a redesigned version, was first released in American test markets in October 1985, before becoming widely available in the rest of North America and other countries.
Known Issues
Cartridges not working
This is one of the most common issues with the NES.
Causes
- Dirty cartridge
- Dirty 72 pin cartridge connector
- Bent 72 pin cartridge connector
Solutions
- Cleaning the cartridge
- Cleaning the cartridge 72 pin cartridge connector
- Repairing or replacing the 72 pin cartridge connector
Disassembly Notes
- For more information, see more on the full page: Disassembly:Nintendo_Entertainment_System
Original Parts
Basic PCB Name
| RefDes | Qty | Capacitance | Voltage | Mount | Diameter/Size | Temp | Type | Brand | Series |
|---|---|---|---|---|---|---|---|---|---|
| 0 µF |
Replacement Parts
Basic PCB Name
| RefDes | Qty | Compatible Part Number | Order Links |
|---|---|---|---|
| Nintendo NES-001 Power/Reset Buttons and Connectors | 1 | Nintendo NES-001 Power/Reset Buttons and Connectors | iFixit |
| Nintendo NES-001 Accessory Port Cover | 1 | Nintendo NES-001 Accessory Port Cover | iFixit |
| Nintendo NES-001 Game Cartridge Tray | 1 | Nintendo NES-001 Game Cartridge Tray | iFixit |
| Nintendo NES-001 Controller Port | 1 | Nintendo NES-001 Controller Port | IFIXIT |
| Nintendo NES-001 Top Case | 1 | Nintendo NES-001 Top Case | IFIXIT |
| Nintendo NES-001 Motherboard | 1 | Nintendo NES-001 Motherboard | iFixit |
| Nintendo NES-001 Bottom Case | 1 | Nintendo NES-001 Bottom Case | iFixit |
If parts are not available or different selection is preferred, you can use the values in the Original Parts section to perform a parametric search.
Kits
Related Links
- 72-PIN Connector Replacement - iFixit Repair Guide
- Motherboard Replacement - iFixit Repair Guide
- Controller Outlet Replacement - iFixit Repair Guide
- Game Cartridge Tray Replacement - iFixit Repair Guide
- Springs Not Properly Mounted on Cartridge Tray Replacement - iFixit Repair Guide
- Cartridge-Dust-Flap Replacement - iFixit Repair Guide
