Xbox One X Power Supply: Difference between revisions
(Changed page links. Added disassembly video in references. Linked to iFixit in psu in parts) |
m (Link to images in Disassembly notes) |
||
| (One intermediate revision by the same user not shown) | |||
| Line 1: | Line 1: | ||
This page is for the [[wikipedia:Xbox_One#Xbox_One_X|Xbox One X]] (1787) Power Supply made by [https://power.liteon.com/ LITEON].{{InfoboxDevice | This page is for the [[wikipedia:Xbox_One#Xbox_One_X|Xbox One X]] (1787) Power Supply made by [https://power.liteon.com/ LITEON].{{InfoboxDevice | ||
|Title =Xbox One X Power Supply | |Title =Xbox One X Power Supply | ||
|Picture =Xbox One X LITEON PSU Overview. | |Picture =Xbox One X LITEON PSU Overview JPG.jpg | ||
|Release Year =November 7, 2017 | |Release Year =November 7, 2017 | ||
|Mounting Technology =Through Hole, SMD | |Mounting Technology =Through Hole, SMD | ||
| Line 32: | Line 32: | ||
== Disassembly Notes == | == Disassembly Notes == | ||
Pry at the sides of the plastic housing. Lifting to free the tabs holding it together. The tabs positions are indicated by the holes on the side of the plastic housing. See Figure A. | Pry at the sides of the plastic housing. Lifting to free the tabs holding it together. The tabs positions are indicated by the holes on the side of the plastic housing. See [[Xbox One X Power Supply#/media/File:Xbox One X LITEON PSU Clip Holes JPG.jpg|Figure A]]. | ||
To remove the circuit board. You will need to remove some of the white Silastic glue in the corner opposite where the cable comes out. As well as near the capacitor itself. See Figure C. | To remove the circuit board. You will need to remove some of the white Silastic glue in the corner opposite where the cable comes out. As well as near the capacitor itself. See [[Xbox One X Power Supply#/media/File:Xbox One X LITEON PSU Glue JPG.jpg|Figure C]]. | ||
You will need to remove the bottom plate covering the PCB. There are tabs on both the front and back you need to flow to remove the plate. Be aware of the thermal pads between the plate and PCB. | You will need to remove the bottom plate covering the PCB. There are tabs on both the front and back you need to flow to remove the plate. Be aware of the thermal pads between the plate and PCB. | ||
| Line 41: | Line 41: | ||
<gallery> | <gallery> | ||
File:Xbox One X LITEON PSU | File:Xbox One X LITEON PSU Clip Holes JPG.jpg|Figure A | ||
File:Xbox One X LITEON PSU Hidden | File:Xbox One X LITEON PSU Hidden clip JPG.jpg|Figure B | ||
File:Xbox One X LITEON PSU | File:Xbox One X LITEON PSU Glue JPG.jpg|Figure C | ||
</gallery> | </gallery> | ||
Latest revision as of 22:50, 26 February 2024
This page is for the Xbox One X (1787) Power Supply made by LITEON.

| Preliminary Information | |
|---|---|
| Release Year | November 7, 2017 |
| Mounting Technology | Through Hole, SMD |
| Capacitor Types | Aluminum Electrolytic, Ceramic |
| Destructive Entry | No |
| Power Requirements | |
| Input Voltage | 100-127V ~ 2.75A 50/60Hz . . . . . . . 200-240V ~ 1.3A 50/60Hz |
| Current (Amps) | 20.42A @ 12V |
This power supply is prone to failure due to little to no ventilation. So the capacitor cooks and vastly reduces its life span. However its worth replacing the single 420v 150µF cap providing the console powers on for a second. Or is making the buzzing noise. No power indicates a do-able, but more involved repair where supposedly you need to source a 4 pin diode package that is somewhat hard to get. Among other parts to replace. Noted in Solutions.
There is another version of the power supply. However the main control chip is directly under the 420v capacitor. Others have deemed them not worth repairing. I do not have access to one.
Known Issues
Capacitor Failure
Symptoms
- The console will produce a buzzing noise.
- The console will not power on or powers on for 5 seconds, then powers off.
Causes
- Poor heat dissipation causes the cap to fail.
Solutions
- Replace the 420v 150uF capacitor.
- If the PSU is completely dead. The repair might be more extensive. See "QS Tech" video in References.
Disassembly Notes
Pry at the sides of the plastic housing. Lifting to free the tabs holding it together. The tabs positions are indicated by the holes on the side of the plastic housing. See Figure A.
To remove the circuit board. You will need to remove some of the white Silastic glue in the corner opposite where the cable comes out. As well as near the capacitor itself. See Figure C.
You will need to remove the bottom plate covering the PCB. There are tabs on both the front and back you need to flow to remove the plate. Be aware of the thermal pads between the plate and PCB.
You could cut the leads to the capacitor and avoid removing the bottom plate if you wanted to save time. Not ideal though.
-
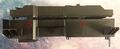
Figure A
-
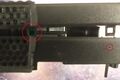
Figure B
-
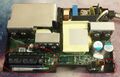
Figure C


Original Parts
Power Supply
| RefDes | Qty | Capacitance | Voltage | Mount | Diameter/Size | Height | Lead Spacing | Temp | Type | Brand | Series |
|---|---|---|---|---|---|---|---|---|---|---|---|
| C150 | 1 | 150 µF | 420 V | Through Hole Radial | 18 mm | 37 mm | 7 mm | 105 °C | Electrolytic | Taicon | 1732(M) |
Replacement Parts
Power Supply
| RefDes | Qty | Compatible Part Number | Order Links |
|---|---|---|---|
| C150 | 1 | 420LXW150MEFR18X35 | Digikey |
You can purchase a used power supply from iFixit here if you wanted to outright replace the power supply.
If parts are not available or different selection is preferred, you can use the values in the Original Parts section to perform a parametric search.
Related Links
References
Here are multiple videos showing the capacitor being replaced.
Qs Tech Service (Xbox Series X Defect Power Supply Rebuild)
TheCod3r (This Xbox One X Makes A Weird Noise When It's Plugged In! Can I Fix It?)
Here is a video showing the buzzing noise the power supply makes. Also the console in the state of turning on and then off.
KeleStraza Repairs Electronics (Can I Fix My Broken Xbox One X Power issues?)
Disassembly Video
MrMario2011 (Xbox One X - Teardown, Repaste, & Reassembly Guide)