Corsair CX500
| This device is in the WorkNeeded:OriginalParts category because it was flagged as missing information on the original parts. It may have replacement parts listed but those cannot be assumed to be identical to the originals. If you have a list of the original parts, please feel free to add them by copying the relevant table from EditorsToolbox:Tables |
| This device is in the WorkNeeded:ReplacementParts category because it was flagged as missing information on replacement parts. If it has the original parts listed you may be able to search for replacements using the parametric searches available from parts distributors. If you have or make a list of replacement parts, please feel free to add them by copying the relevant table from EditorsToolbox:Tables |

| Preliminary Information | |
|---|---|
| Release Year | ~2013 |
| Leak Risk | Low |
| Mounting Technology | Through Hole, SMD |
| Capacitor Types | Aluminum Electrolytic, Ceramic |
| Destructive Entry | No |
The Corsair CX500 is one of the budget model PSU's. It's very similar to the CX450 and CX600 and its modular counterpart CX500M.
This PSU used CapXon brand capacitors, so they might fail quicker than usual.
Known Issues
Cause
After several years of use, the computer will sometimes not turn on. In-particular the the 'Power Good' signal will not work even though it's outputting all the voltage rails correctly.
Solution
- Change/Modify a single resistor. This is not a capacitor issue
Original Parts
Located on the back of the PCB, near the middle.
| RefDes | Qty | Capacitance | Mount | Size | Brand |
|---|---|---|---|---|---|
| R45 | 1 | 22K | SMD | 0805 | Unknown |
Replacement Parts
| RefDes | Qty | Compatible Part Number | Distributor Links
[ Preferred / Search ] | |||||
|---|---|---|---|---|---|---|---|---|
| Digikey | Mouser | Farnell | ||||||
| R45 | 1 | 15K | Part | 🔎 | Part | 🔎 | Part | 🔎 |
Generally speaking you do not need to buy a resistor. Most SMD's can be obtained from an old circuit board. If you can not find a 15K you can use a slightly higher value.
Alternatively you can parallel up a resistor on top of the existing resistor. E.G use a value from 47K to 100K and solder it directly on top. Providing Pin 1 of the power monitoring IC is about 2.5v. (as long as it is above the 1.3v it currently is)
Related Media
Additional Images
-
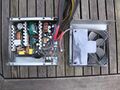
Open Lid
-
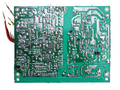
PCB Bottom
-
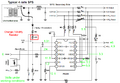
Partial schematic around the Monitor Chip


