Dell Dimension 2400: Difference between revisions
No edit summary |
No edit summary |
||
| (One intermediate revision by one other user not shown) | |||
| Line 6: | Line 6: | ||
|Capacitor Types = Aluminum Electrolytic | |Capacitor Types = Aluminum Electrolytic | ||
|Leak Risk = Medium | |Leak Risk = Medium | ||
|Batteries = | |Batteries = 1x CR2032 | ||
|Destructive Entry = No | |Destructive Entry = No | ||
}} | }} | ||
| Line 63: | Line 63: | ||
| C200, C204, C211, C212, C213, C214, C215 | | C200, C204, C211, C212, C213, C214, C215 | ||
| 7 | | 7 | ||
| SPZ1AM222G15O00RAXXX | | A759MS228M0JAAE013 / SPZ1AM222G15O00RAXXX | ||
|[https://www.lcsc.com/product-detail/Solid-Capacitors_AISHI-Aihua-Group-SPZ1AM222G15O00RAXXX_C2987728.html LCSC] | |[https://www.digikey.com/en/products/detail/kemet/A759MS228M0JAAE013/13420067 DigiKey] [https://www.mouser.com/ProductDetail/KEMET/A759MS228M0JAAE013?qs=sGAEpiMZZMvR1wrj203KOIBOOW3024qOvtNeGtmsSI9BJikzKI0gGw%3D%3D Mouser] [https://www.lcsc.com/product-detail/Solid-Capacitors_AISHI-Aihua-Group-SPZ1AM222G15O00RAXXX_C2987728.html LCSC] | ||
|} | |} | ||
Latest revision as of 17:50, 30 January 2024
| Preliminary Information | |
|---|---|
| Release Year | 2003 |
| Leak Risk | Medium |
| Batteries | 1x CR2032 |
| Mounting Technology | Through Hole, SMD, BGA, Sockets |
| Capacitor Types | Aluminum Electrolytic |
| Destructive Entry | No |
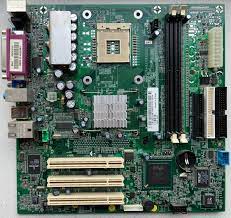
The Dimension 2400 is a budget Socket 478 desktop computer sold by Dell, usually featuring a Celeron processor.
Known Issues
Symptom or Problem Encountered
The motherboard would not power on or show any signs of life other than an LED near the 20-pin connector. When the power button was pressed, nothing happened.
Cause
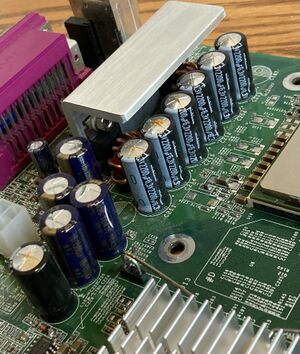
The 2200μF Nichicon capacitors on the power delivery suffer from manufacturing defects and tend to fail. On my example all of them were bulged to varying degrees, and the motherboard would not even attempt to power on with these capacitors.

Solution
Replace the faulty capacitors. Only the failed 2200μF capacitors need to be replaced as long as the other ones are in good condition as they were on mine.
Disassembly Notes
Replacing the thermal paste on both the CPU and chipset is recommended. The chipset heatsink is easy to remove by pushing each of the four retention clips down and out from under the hooks to release them. Try to release and reinstall the clips on diagonals to maintain even pressure on the chipset and to prevent the heatsink from springing off the motherboard. It may be difficult to remove at first because of the hardened thermal paste, lightly heat up the area as necessary to avoid damaging anything by forcing it off.
When installing the new caps, you may find that they are easier to align if the legs are trimmed first, since the overhanging heatsink gets in the way. It's attached to the motherboard with screws, but you can't easily remove it.
Original Parts
P/N 411726100004 Rev. A01
| RefDes | Qty | Capacitance | Voltage | Mount | Diameter/Size | Height* | Temp | Type | Brand | Series |
|---|---|---|---|---|---|---|---|---|---|---|
| C200, C204, C211, C212, C213, C214, C215 | 7 | 2200μF | 6.3V | Through Hole | 10mm | 20mm | 105°C | Electrolytic | Nichicon | HM(M) Datasheet |
*Height is important due to clearance limitations. Replacement parts not to exceed this limit.
Replacement Parts
P/N 411726100004 Rev. A01
| RefDes | Qty | Compatible Part Number | Order Links |
|---|---|---|---|
| C200, C204, C211, C212, C213, C214, C215 | 7 | A759MS228M0JAAE013 / SPZ1AM222G15O00RAXXX | DigiKey Mouser LCSC |
